Basic Server Security
Introduction
As cyber-attacks become increasingly prevalent, safeguarding your cloud server is more vital now than ever before. Protecting it from the various types of threats lurking online should be a top priority in order to ensure its security and longevity.
Get your system secure in no time with this simple, straightforward guide to deploying basic security policies.
Create SSH key
What is SSH key?
SSH key is a cryptographic key that is used to authenticate remote users and systems. It can be used in place of or in addition to passwords for logging into a system.
SSH keys consist of two parts, a public key and a private key. The public key is copied to the remote system and the private key is kept secret on the local system. When you log in using SSH, your client uses your public key to encrypt a message and sends it to the remote system. The remote system uses its copy of your public key to decrypt the message and determines whether you are authorized to login. If you are not authorized, the remote system will refuse your connection.
Why to use SSH key?
There are several benefits of key-based authentication:
Key-based login is not a major target for brute-force hacking attacks.
- Increased security - Using a key to authenticate allows you to verify that the person trying to access your account is actually who they say they are, without having to rely on passwords alone.
- Enhanced privacy - Unlike passwords, which can be easily seen and copied by third parties, keys are not as easily accessible and therefore offer greater privacy protection.
- Reduced risk of account theft - Even if a malicious hacker infiltrates an SSH-protected server, they won't be able to gain access as sensitive authorization credentials remain safe and secure.
Generating SSH key
Let's get started by unlocking the power of secure access through creating an SSH key.
Termius terminal manager
You can easily create your SSH key in Termius mobile application.
Windows, Linux and macOS
You can generate your SSH keys in default terminal applications like PowerShell in Windows or Terminal in macOS and Linux.
This command will overwrite an existing RSA key pair, potentially locking you out of other systems.
Copy and paste following commands.
- Generate SSH key pair
ssh-keygen -b 4096
- Press enter for default names.
You can name your private and pub key, if you want.
- Enter passphrase.
When generating a key pair, you can add an extra layer of security by encrypting the private key with your own passphrase. This way, it becomes virtually impossible to access and use the keys without entering passphrase.
Copy generated public SSH key
I use Termius for adding SSH keys to servers, but you can also do it manually. You can also use ssh-copy-id utility.
Finding your pub key
Depending on system, your .pub key will resides in your home folder.
Windows
Your generated keys will be located at C:\Users\your-username/.ssh/ folder.
Output content of id_rsa.pub and copy values to your password manager.
cat ~/.ssh/id_rsa.pub
Linux, macOS
Your generated keys will be located at /home/username/.ssh/ folder.
Output content of id_rsa.pub and copy values to your password manager.
cat ~/.ssh/id_rsa.pub
Add public key to your server
Once you copied value from id_rsa.pub, you need to add it into your server.
Root user
You can add your public key in your server provider dashboard, but if you don't have that option please follow these steps.
- Log in as root user
- Create folder and authorized_keys file
nano /.ssh/authorized_keys
If nano editor is missing, run apt install nano -y.
- Paste public key value
- Press CTRL+O and Enter to confirm changes
- Press CTRL+X to exit
Create local user
The root user is the administrative user in a Linux environment that has very broad privileges. Because of the heightened privileges of the root account, you are discouraged from using it on a regular basis. This is because the root account is able to make very destructive changes, even by accident.
For security reasons, we don't want to use default root user.
To create local user, please use those commands:
- Create user
adduser yourusername
Replace user yourusername with username, you would like to use.
You will be asked a few questions, starting with the account password. Enter a strong password and, optionally, fill in any of the additional information if you would like. This is not required and you can just hit ENTER in any field you wish to skip.
Grant Privileges
We have now new user account, but we need to perform basic administrative tasks.
To avoid having to log out of our normal user and log back in as the root account, we can set up what is known as superuser or root privileges for our normal account. This will allow our normal user to run commands with administrative privileges by putting the word sudo before the command.
- In order to have administrative privileges, use following command:
usermod -aG sudo yourusername
Replace user yourusername with username, you have chosen.
Disabling Root Login
In order to disable root logins, we have to edit some lines in our sshd_config file.
- Open sshd_config file:
sudo nano /etc/ssh/sshd_config
- Find PermitRootLogin line and change it to no:
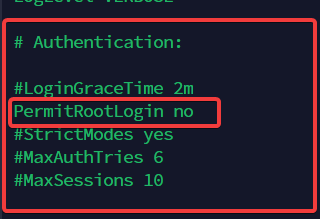
- Find PasswordAuthentication line and change it to yes:

If you are using your SSH key instead of password auth, change sshd_config file like screenshot bellow.

Local User
When we have our local user, we need to copy id_rsa.pub key value into:
- Exit from root and login as local user
su yourusername
Replace user yourusername with username, you have chosen.
2. Create .ssh folder and authorized_keys filesudo nano home/yourusername/.ssh/authorized_keys
Replace user yourusername with username, you have chosen.
If nano editor is missing, run apt install nano -y.
- Paste public key value
- Press CTRL+O and Enter to confirm changes
- Press CTRL+X to exit
- Restart SSH service:
systemctl restart sshd
Install UFW Firewall
If hardware level Firewall fails, it is always good to have a software level Firewall just in case.
- Install UFW:
sudo apt install ufw -y
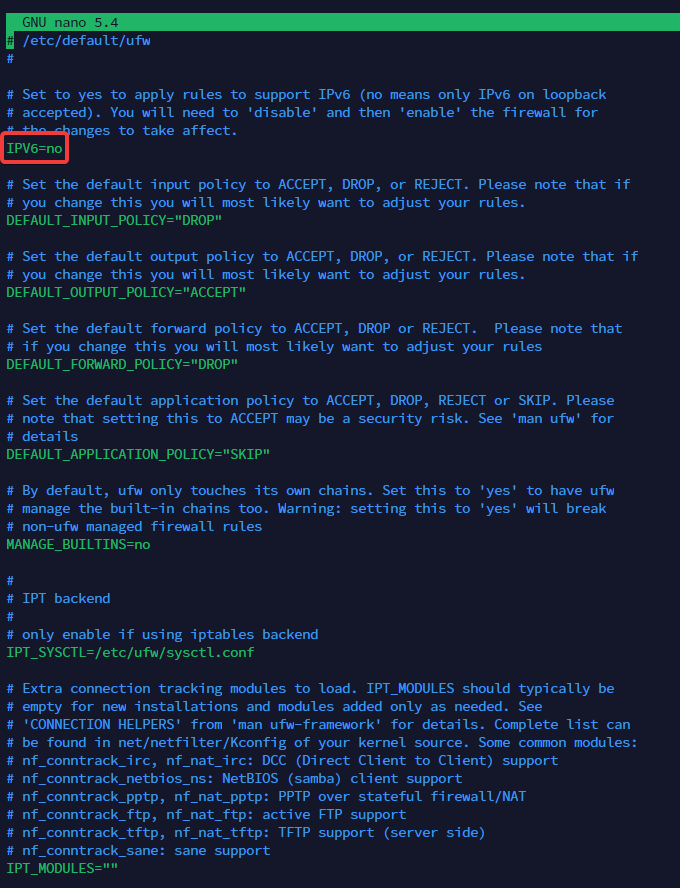
- Edit default config, to disable IPv6:
sudo nano /etc/default/ufw
Then change value IPV6=no
- Write out changes by pressing CTRL+O and hit ENTER
- Exit by pressing CTRL+X
- Reset default rules in UFW:
sudo ufw reset
- Confirm by typing y and press Enter
- Deny incoming connections:
sudo ufw default deny incoming
- Allow outgoing connections:
sudo ufw default allow outgoing
- Allow SSH connections on port 22 and HTTP/HTTPS connections:
sudo ufw allow 22 && sudo ufw allow http && sudo ufw allow https
If you have dedicated IP, please use following command bellow.
sudo ufw allow from 127.1.0.1 to any port 22
Replace 127.1.0.1 for your own IP address.
9. Enable Firewallsudo ufw enable
- Confirm by typing y and press Enter
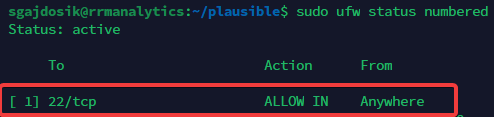
- List Firewall rules:
sudo ufw status numbered
Make sure you have only rules, that you added!.
- Enable UFW startup after reboot:
sudo systemctl enable ufw
CrowdSec Installation
Conclusion
Equipping your server with the essential security measures is definitely a great first step. However, if you're looking to proactively protect yourself by implementing even more secure policies and practices, or want an audit of existing protocols - I'm here to assist you.
Please reach me at this email address.