Plausible Installation Guide

Google Analytics is the most popular and widely used analytics tool in the world, but it doesn't always have your best interests at heart.
Fortunately there are alternatives like Plausible Analytics that will give you more privacy-friendly data.
Follow along this comprehensive installation tutorial, to get your own Plausible Analytics instance running for your business.
If you like Plausible software, please consider sponsoring Plausible project or subscribing to their cloud platform.
We simplified the process of deploying Plausible on your infrastructure by creating a custom installation script. You can also refer to the installation guide by Plausible..
Before you proceed, you need to make sure that your server is properly secured and your firewall rules are in place!
Before you proceed, make sure you have secured docker daemon.
You can also refer to the securing Docker daemon.
Webnestify is here to help you with installation if needed. We will install your desired applications, in case of being stuck securing your docker or server.
For more information, please visit our Docker deployment service page.
Prerequisites
Before installation, make sure that you have prepared the following requirements to have a fully functional instance.
- SMTP API keys | We recommend Postmark SMTP service.
- Google Search Console API keys | Follow this guide to get your API keys.
- Max Minds GeoIP API keys | Create free account.
- Virtual Private Server | Ideally GDPR protected VPS by DPA. We recommend Hetzner Cloud.
If you use link above for Hetzner Cloud, you will receive 20€ in cloud credits.
- Domain in Cloudflare | In this setup, we will use Cloudflare Zero Trust service. For tutorial how to create your Zero Trust account, watch this video to get prepared.
- Debian 11 OS with no other applications running on the server
- At least 2GB Ram
- Basic Docker/Linux knowledge
- Docker Engine Packages Installed | Please refer to our documentation.
- Cloudflared Installed | Please refer to our documentation.
- Terminal Manager | Use a good terminal manager. We recommend Termius.
If you have following requirements, you can follow along this video tutorial and find everything documented in this page.
Video Walkthrough
Documentation
Create your VPS
In this guide, we will use server from Hetzner. For complete GDPR compliance, Hetzner offers DPA (Data processing agreement) for your account.
You can get 20€ in cloud credits using this link for Hetzner Cloud.
Choosing the right server
Depending on website traffic and how many websites you want to add to Plausible, we recommend using a minimum of 2GB of RAM.
CPX11 server type is enough for starting out.
- Datacenter: Choose datacenter
- Image: Choose Debian 11
- Server Type: CPX11
- Networking: Disable IPv6
- Enable backups
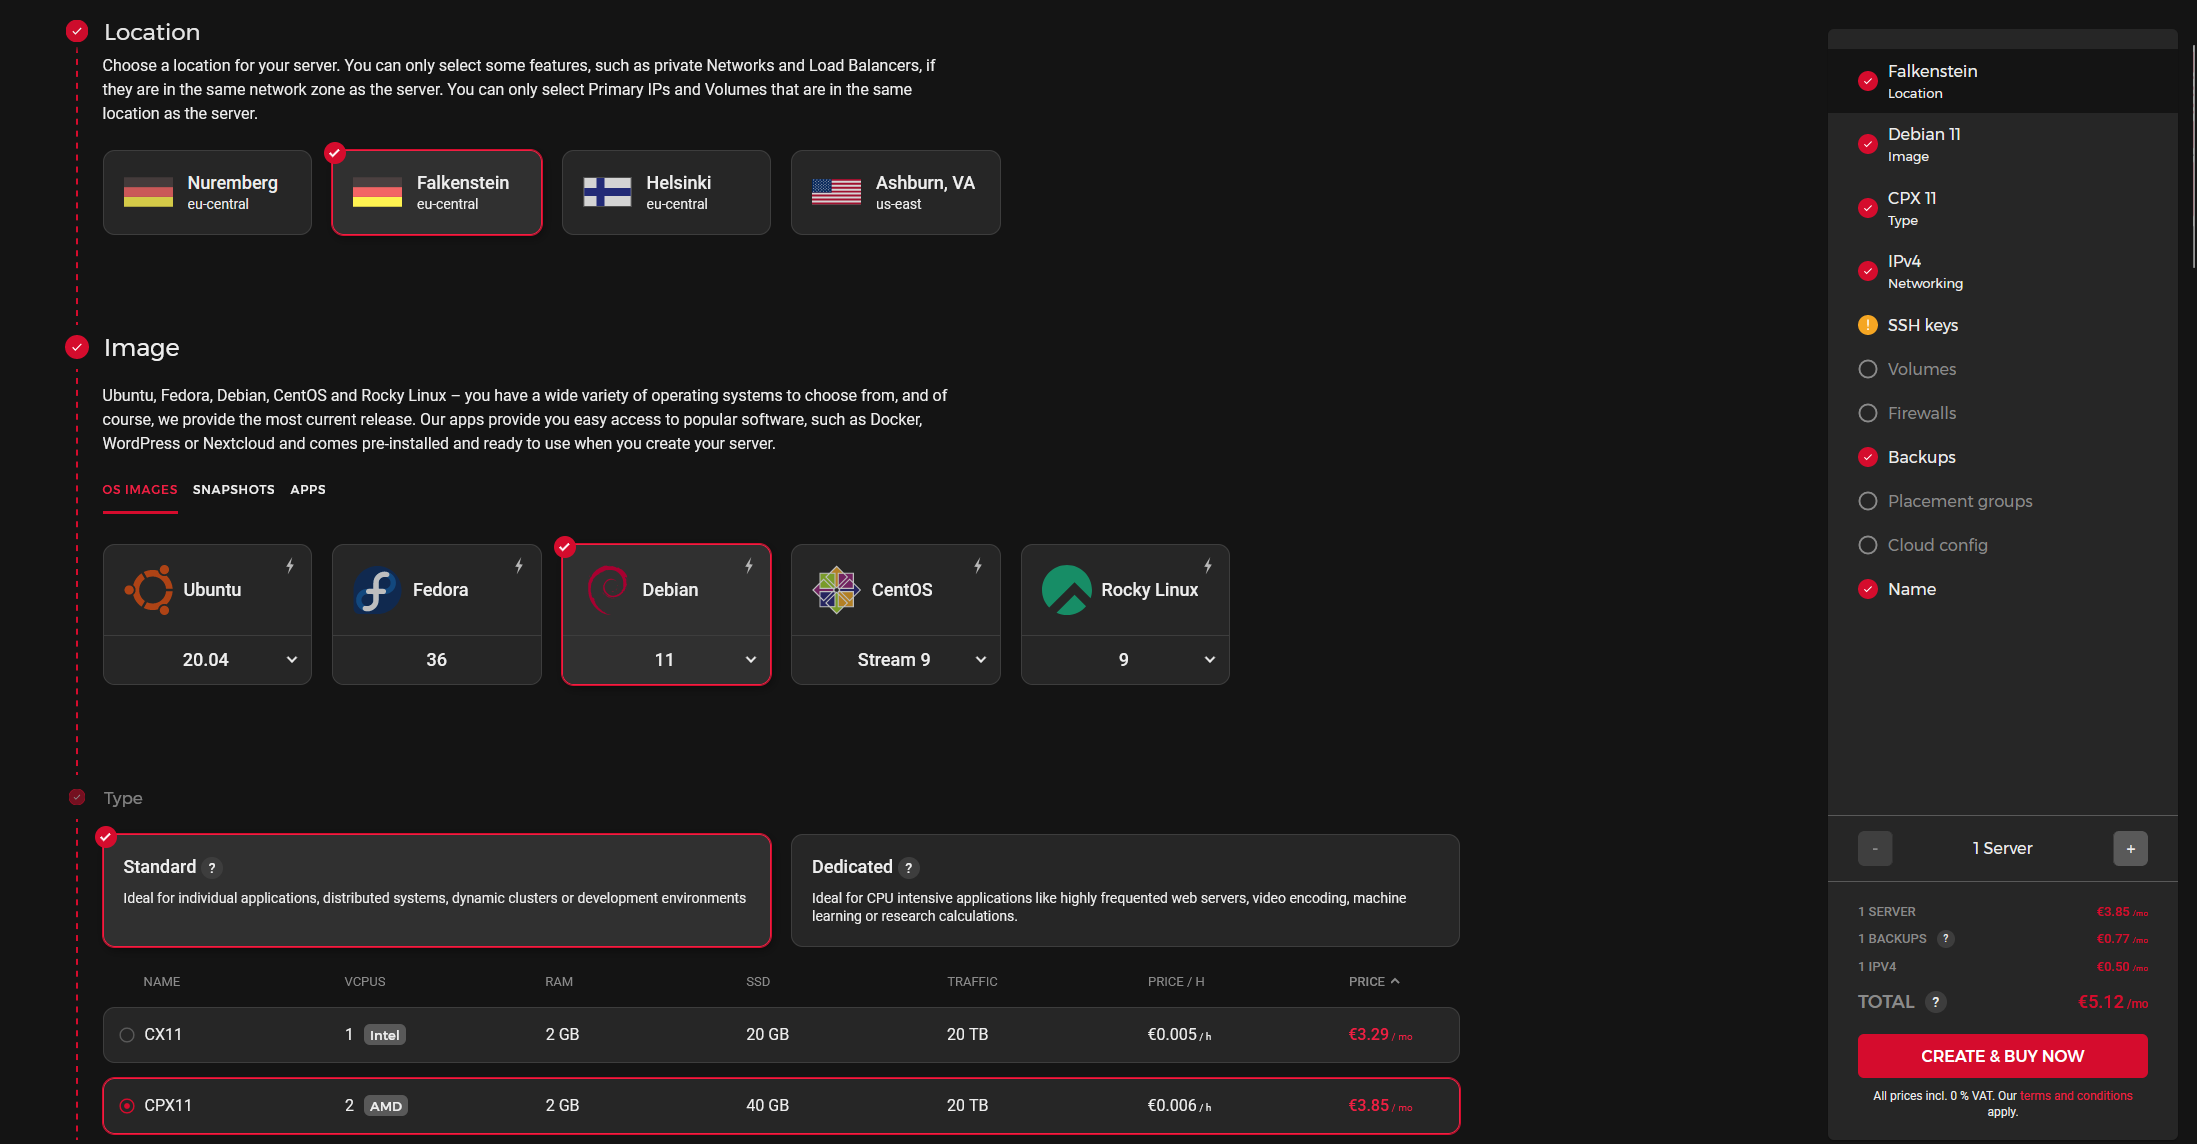 Create your server.
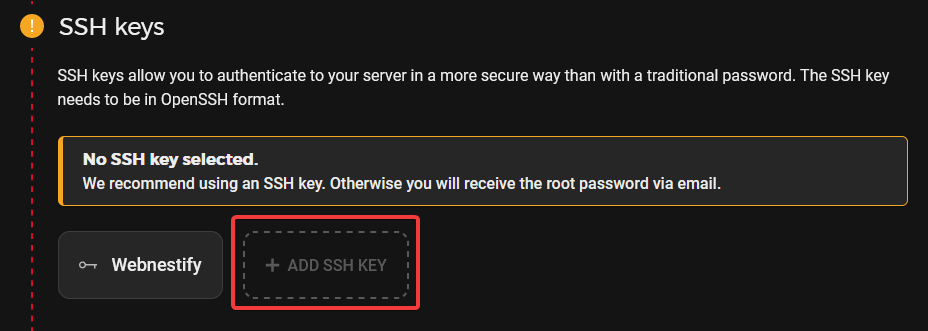
If you have SSH key, you can add your key in the menu.
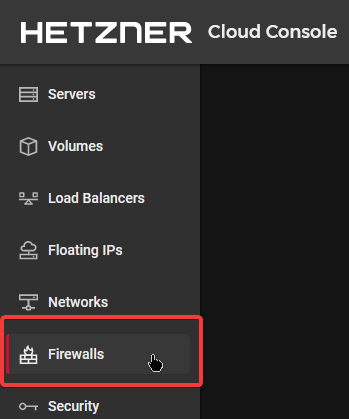
Create Firewall
It is best practice, to setup hardware level Firewall on your server.
- Create new Firewall with following values:
- Allow port 22 on IPv4 addresses only
- Remove all other rules
If you have dedicated IP, remove IPv4 rule and add your dedicated IP address.
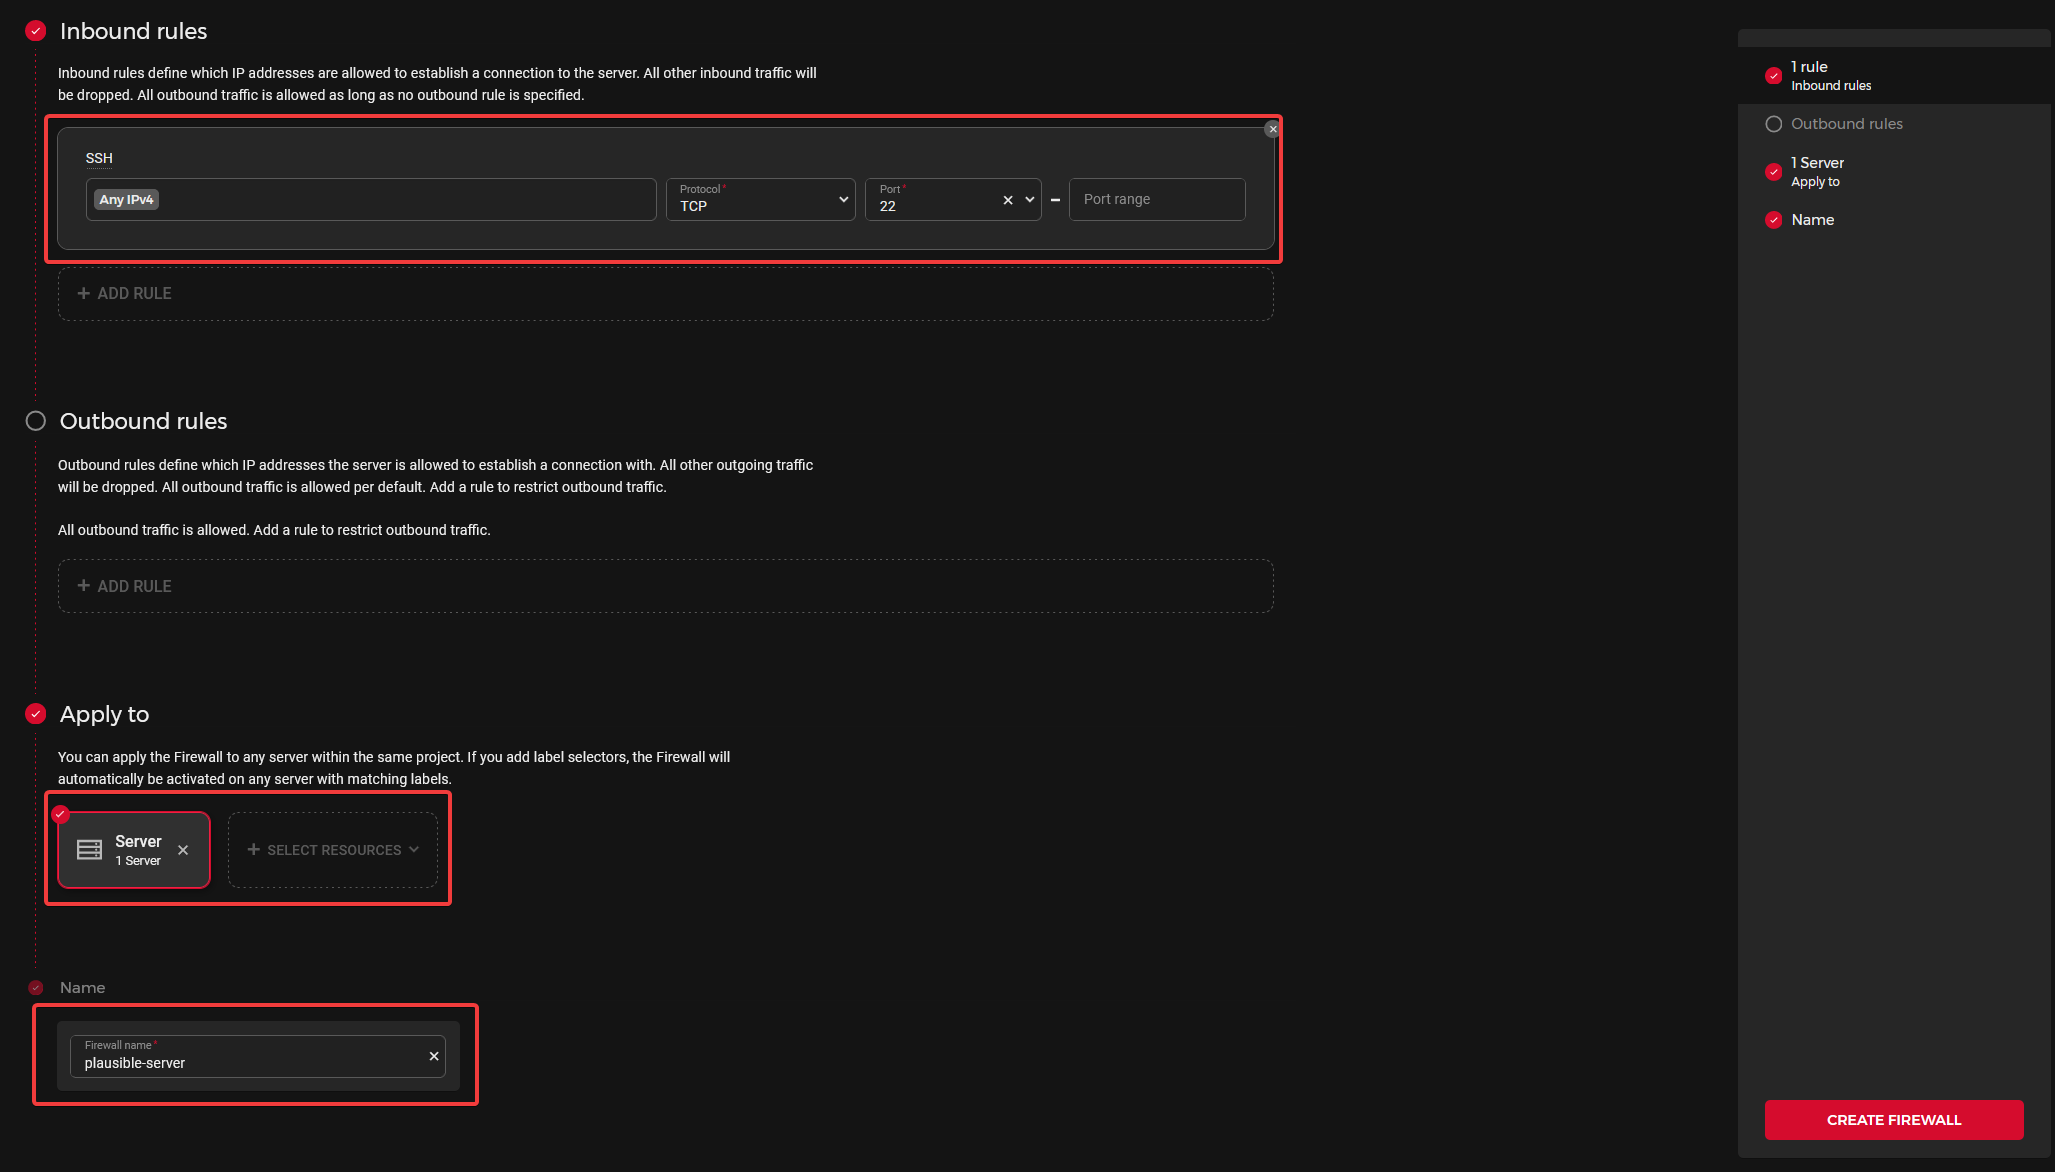
- Apply your Firewall to your Plausible server
- Create Firewall
System Preparation
Before you start installing required packages, you need to prepare your linux server. Some parts of system preparation guide are inspired by initial server setup by Digital Ocean.
You are about to edit system config files, so please be very careful otherwise, you can break your system and you would have to redeploy your server.
If you are feeling uncomfortable editing system configs, let us help you with your Docker deployment.
Logging into server
You can use built-in terminal, but it is not very good option for editing files. We recommend to use any terminal manager like Putty or Termius.
- Use following command to ssh into the server:
ssh root@your-server-ip
You will receive your root password by email. After you log-in, you will be required to create a new password.
Replace your-server-ip for your IP address provided by Hetzner.
Creating Local User
The root user is the administrative user in a Linux environment that has very broad privileges. Because of the heightened privileges of the root account, you are discouraged from using it on a regular basis. This is because the root account is able to make very destructive changes, even by accident.
For security reasons, we don't want to use default root user.
To create local user, please use those commands:
- Create user
adduser plausible
Replace user plausible with username, you would like to use.
You will be asked a few questions, starting with the account password. Enter a strong password and, optionally, fill in any of the additional information if you would like. This is not required and you can just hit ENTER in any field you wish to skip.
Grant Privileges
We have now new user account, but we need to perform basic administrative tasks.
To avoid having to log out of our normal user and log back in as the root account, we can set up what is known as superuser or root privileges for our normal account. This will allow our normal user to run commands with administrative privileges by putting the word sudo before the command.
- In order to have administrative privileges, use following command:
usermod -aG sudo plausible
Replace user plausible with username, you have chosen.
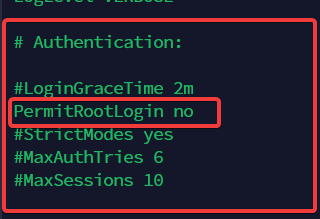
Disabling Root Login
In order to disable root logins, we have to edit some lines in our sshd_config file.
- Open sshd_config file:
sudo nano /etc/ssh/sshd_config
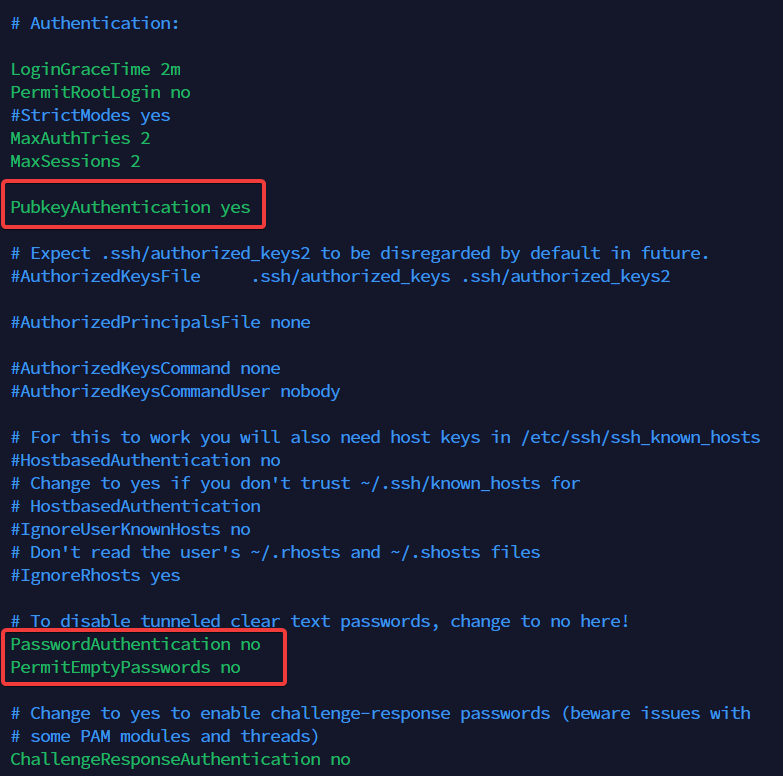
- Find PermitRootLogin line and change it to no:
- Find PasswordAuthentication line and change it to yes:

If you are using your SSH key instead of password auth, change sshd_config file like screenshot bellow.
Install UFW Firewall
If hardware level Firewall fails, it is always good to have a software level Firewall just in case.
- Install UFW:
sudo apt install ufw -y
- Edit default config, to disable IPv6:
sudo nano /etc/default/ufw
Then change value IPV6=no
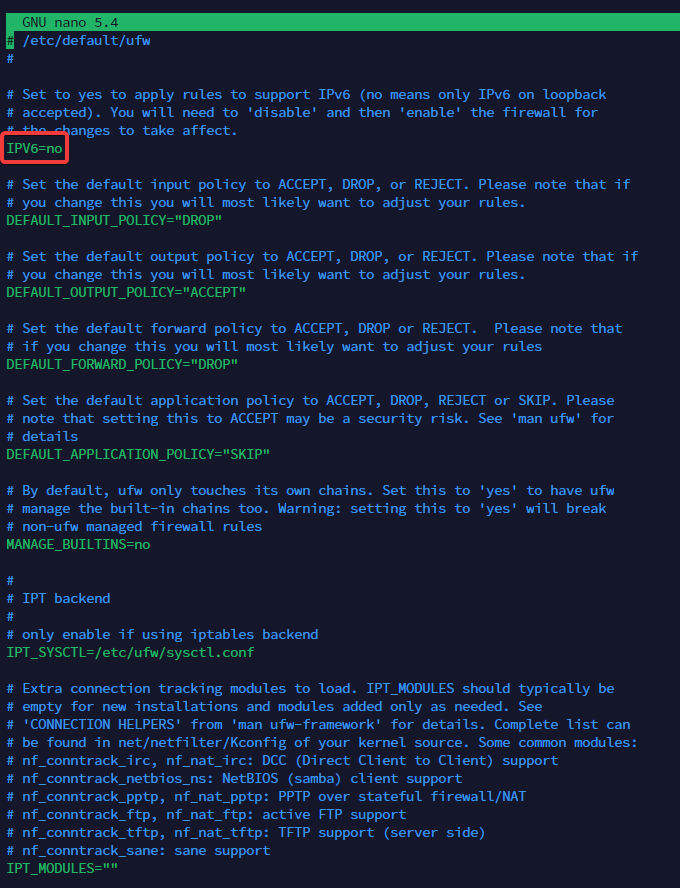
- Write out changes by pressing CTRL+O and hit ENTER
- Exit by pressing CTRL+X
- Reset default rules in UFW:
sudo ufw reset
- Confirm by typing y and press Enter
- Deny incoming connections:
sudo ufw default deny incoming
- Allow outgoing connections:
sudo ufw default allow outgoing
- Allow SSH connections on port 22:
sudo ufw allow 22
If you have dedicated IP, please use following command bellow.
sudo ufw allow from 127.1.0.1 to any port 22
Replace 127.1.0.1 for your own IP address.
9. Enable Firewallsudo ufw enable
- Confirm by typing y and press Enter
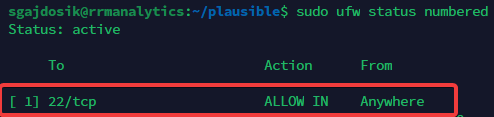
- List Firewall rules:
sudo ufw status numbered
Make sure you have only one rule there.
- Enable UFW startup after reboot:
sudo systemctl enable ufw
- Reboot your server:
reboot
If you are not using dedicated IP for your port 22, we highly recommending CrowdSec package to protect your port from attacks.
Our customers, who are renting servers with us or signed up for server management service will get dedicated IP as a customer benefit.
Docker Engine Installation
Make sure to install latest Docker Engine packages. For more information, please see official docker website.
Logging back into server
You can use built-in terminal, but it is not very good option for editing files. We recommend to use any terminal manager like Putty or Termius.
- Use following command to ssh into the server:
ssh your-username@your-server-ip
Replace your-username for username, that you created and your-server-ip for your IP address provided by Hetzner.
Script Download & Installation
- Download script via CURL:
curl -fsSL get.docker.com -o get-docker.sh
- Execute script:
sudo sh get-docker.sh
- Wait for installation to complete and check versions:
sudo docker version
sudo docker compose version
- Test hello-world image:
sudo docker run hello-world
- Add user to Docker group:
sudo usermod -aG docker plausible
Replace user plausible with username, you have chosen.
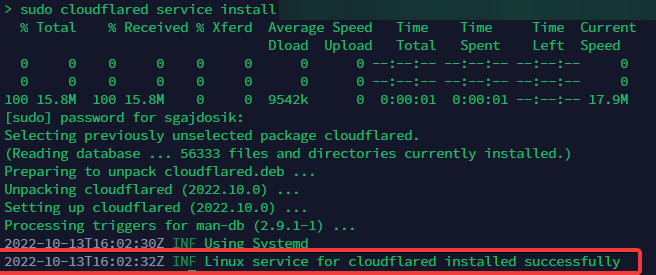
Cloudflared Installation
Please follow this guide, to get latest Cloudflared service installed on your server.
Set up the repository
- Add Cloudflare GPG Key
sudo mkdir -p --mode=0755 /usr/share/keyrings
curl -fsSL https://pkg.cloudflare.com/cloudflare-main.gpg | sudo tee /usr/share/keyrings/cloudflare-main.gpg >/dev/null
- Use the following command to set up the repository:
echo 'deb [signed-by=/usr/share/keyrings/cloudflare-main.gpg] https://pkg.cloudflare.com/cloudflared bullseye main' | sudo tee /etc/apt/sources.list.d/cloudflared.list
Install Cloudflared service
sudo apt-get update && sudo apt-get upgrade -y && sudo apt-get install cloudflared -y
Plausible Installation
You are about to proceed with installation. Make sure to pay attention!
Edit Installation File
Our installation file is docker-compose.yml in plausible folder.
Pay attention, while working in the installation file. Make sure to only change values in squared brackets'[YOUR VALUE]' or uncommenting line by removing '#'.
1. Create secret hash:openssl rand -base64 64 | tr -d '\n' ; echo
Copy value and paste it in SECRET_KEY_BASE=
2. Open docker-compose.ymlnano docker-compose.yml
-
Please change to your own values [YOUR VALUE]!
version: "3.3"

services:
  mail:
    image: bytemark/smtp #SMTP Mailer Service
    restart: always
    labels:
      - "com.centurylinklabs.watchtower.enable=true" # Change 'true' to 'false' if you want to disable autoupdate.

  plausible_db:
    # supported versions are 12, 13, and 14
    image: postgres:alpine #User data database
    restart: always
    volumes:
      - ./db-data:/var/lib/postgresql/data
    environment:
      - POSTGRES_PASSWORD=postgres

  plausible_events_db:
    image: clickhouse/clickhouse-server:latest-alpine #Analytics database
    restart: always
    volumes:
      - ./plausible/event-data:/var/lib/clickhouse
      - ./clickhouse/clickhouse-config.xml:/etc/clickhouse-server/config.d/logging.xml:ro
      - ./clickhouse/clickhouse-user-config.xml:/etc/clickhouse-server/users.d/logging.xml:ro
    ulimits:
      nofile:
        soft: 262144
        hard: 262144

  plausible:
    image: plausible/analytics #Plausible API & Front-end
    restart: always
    command: sh -c "sleep 10 && /entrypoint.sh db createdb && /entrypoint.sh db migrate && /entrypoint.sh db init-admin && /entrypoint.sh run"
    depends_on:
      - plausible_db
      - plausible_events_db
      - mail
    ports:
      - 8004:8000
    environment:
      - ADMIN_USER_EMAIL=[YOUR VALUE]
      - ADMIN_USER_NAME=[YOUR VALUE]
      - ADMIN_USER_PWD=[YOUR VALUE] # Use only character and numbers
      - BASE_URL=[YOUR VALUE] # for example, https://analytics.example.com
      - DISABLE_REGISTRATION=true # Change 'true' to false if you want to enable public registrations
      - SECRET_KEY_BASE=[YOUR VALUE] # To get key, run following command: openssl rand -base64 64 | tr -d '\n' ; echo
      - MAILER_EMAIL=[YOUR VALUE] #change later to your own
      - SMTP_HOST_ADDR=[YOUR VALUE] # Change SMTP server, if you are not using Postmark
      - SMTP_HOST_PORT=587 # If not supported, change to your supported SMTP port
      - SMTP_USER_NAME=[YOUR VALUE] #change later to your own
      - SMTP_USER_PWD=[YOUR VALUE] #change later to your own
      - SMTP_HOST_SSL_ENABLED=true
      - MAILER_ADAPTER=Bamboo.SMTPAdapter # Change 'Bamboo.SMTPAdapter' to 'Bamboo.PostmarkAdapter' if you are not using Postmark.
#      - POSTMARK_API_KEY=[YOUR VALUE] # Keep commented out by '#' at the beginning of this line, if you are not using Postmark.
      - GOOGLE_CLIENT_ID=[YOUR VALUE]
 # Uncommend this line and add your API Keys. Visit https://plausible.io/docs/self-hosting-configuration#google-search-integration to get your API keys.
      - GOOGLE_CLIENT_SECRET=[YOUR VALUE]
 # Uncommend this line and add your API Keys. Visit https://plausible.io/docs/self-hosting-configuration#google-search-integration to get your API keys.

  plausible_geoip:
    image: maxmindinc/geoipupdate:latest #GEO IP Service
    environment:
      - GEOIPUPDATE_EDITION_IDS=GeoLite2-Country
      - GEOIPUPDATE_FREQUENCY=168 # update every 7 days
      - GEOIPUPDATE_ACCOUNT_ID=[YOUR VALUE] # Generate key at https://www.maxmind.com/en/geolite2/signup?lang=en
      - GEOIPUPDATE_LICENSE_KEY=[YOUR VALUE] # Generate key at https://www.maxmind.com/en/geolite2/signup?lang=en
    volumes:
      - ./geoip:/usr/share/GeoIP
    restart: always
- Edit values in squared brackets
- Write out changes by pressing CTRL+O and hit ENTER
- Exit by pressing CTRL+X
Perform Installation
After you written out all changes and added your api keys, we can install our Plausible stack.
- Run this command to install:
docker compose up -d
It can take couple minutes to install.
- Verify docker containers are running:
docker ps
- All containers should be running:

If you see status RESTARTING you have made typo in docker-compose.yml installation file. You need to go back edit installation file!

If you are stuck and don't know where did you make mistake, visit our Docker deployment service.
Setup Cloudflare Integration
Before we connect our server to Cloudflare, you need to have your main domain in Cloudflare and also have your free Zero Access account created.
You can watch this tutorial how to create your Zero Trust account.
Create tunnel
We need to create our tunnel for Plausible server.
- Go to Access > Tunnels:

- Create and name your tunnel:

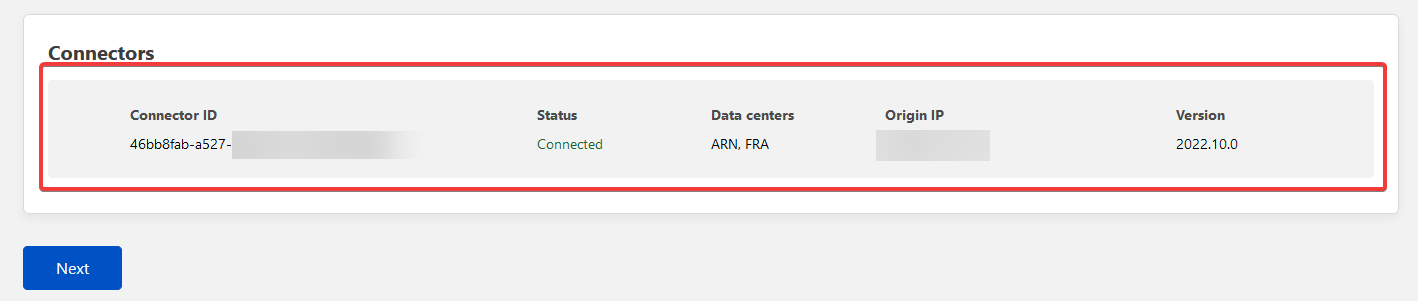
- Choose tunnel environment and install connector: We already installed our Cloudflared package in our server, so select box on the right side.

- Go back to terminal and paste connector and hit Enter:
- Verify established connection and click Next:
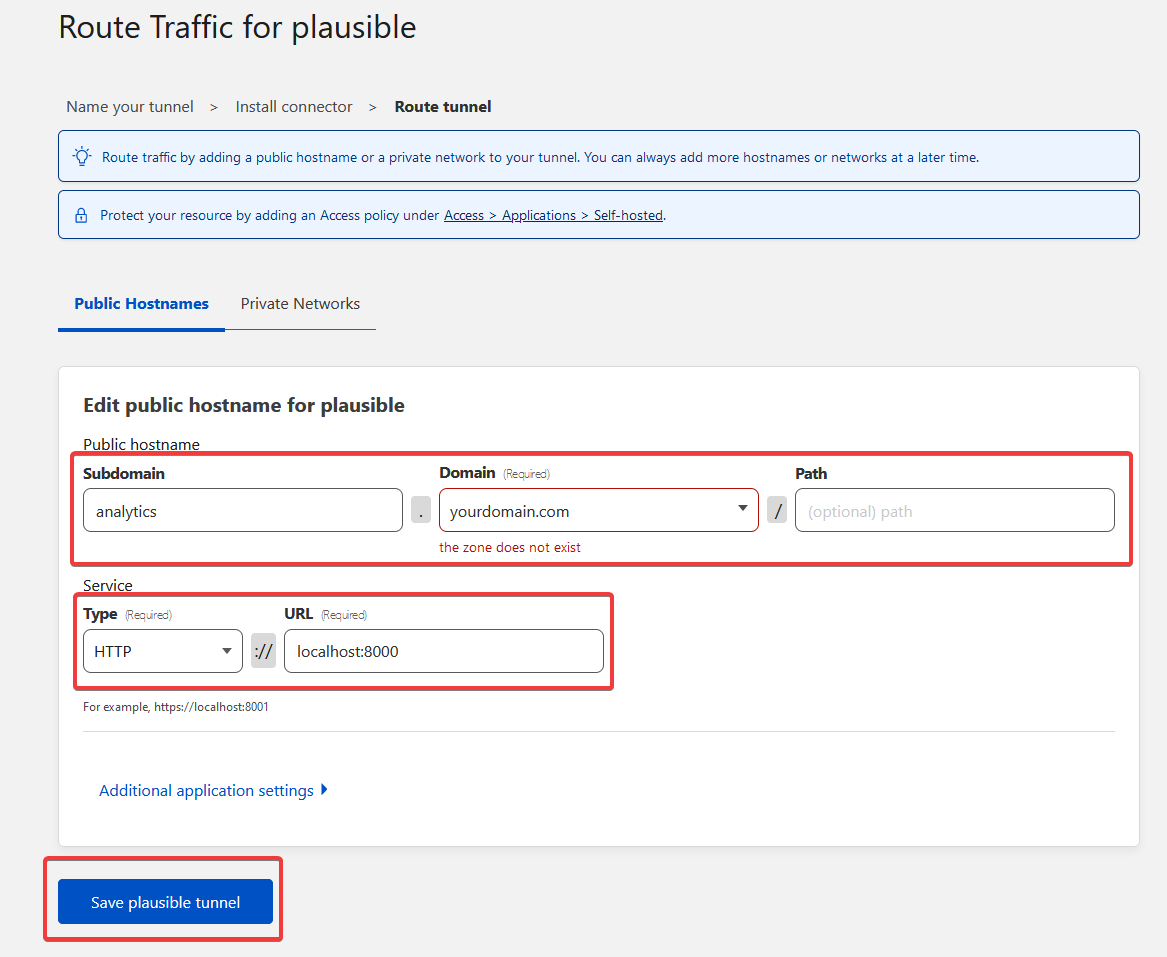
- Add your domain details and tunnel service:
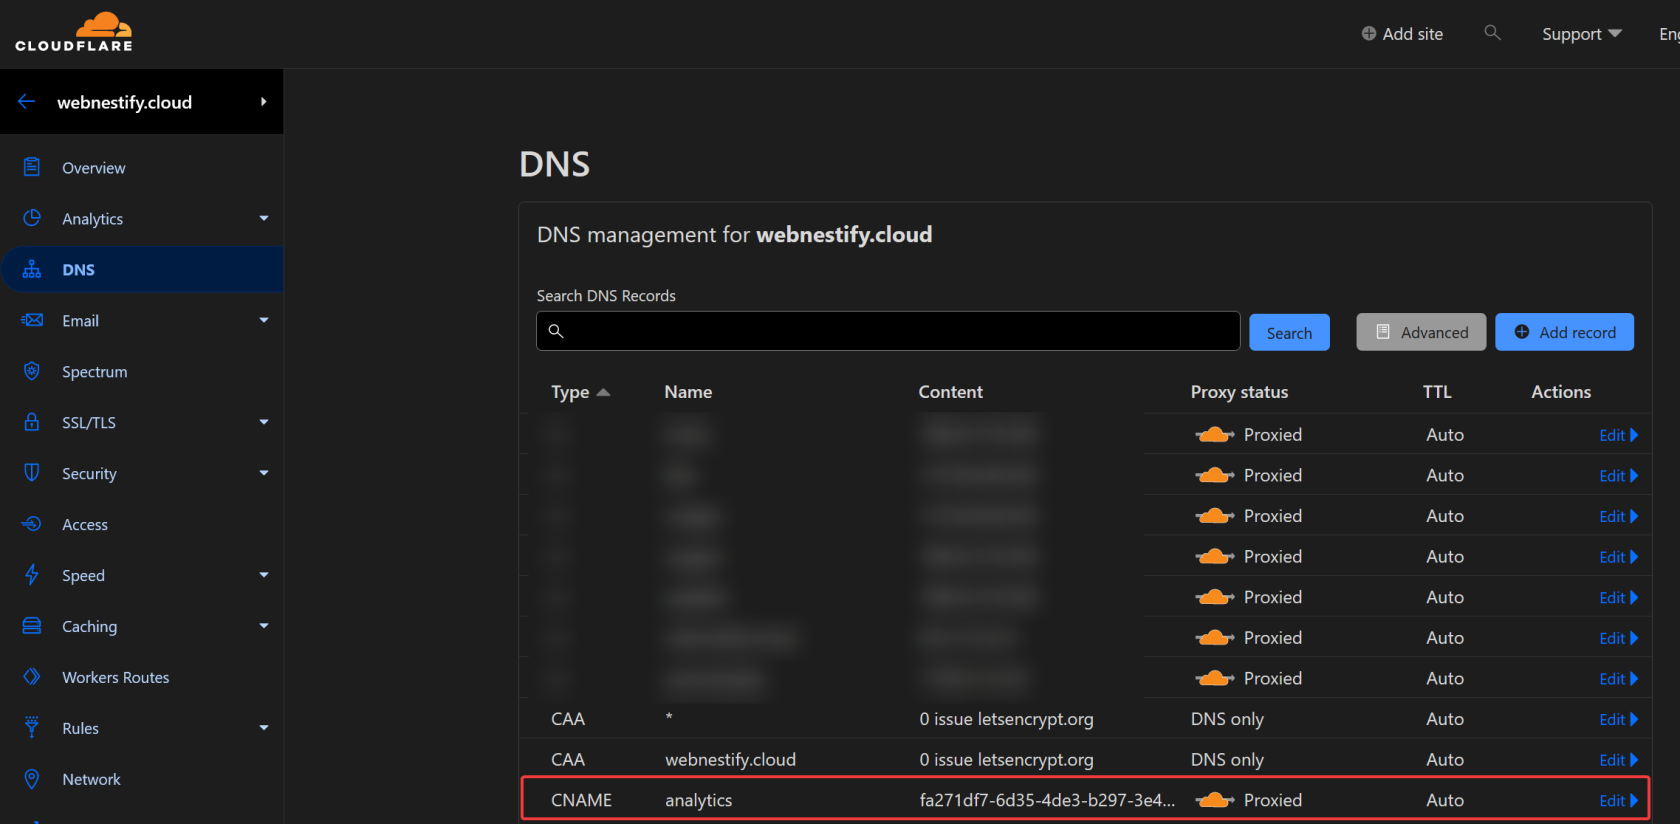
- Verify DNS record:
Make sure you have orange cloud icon, otherwise connection will not work.
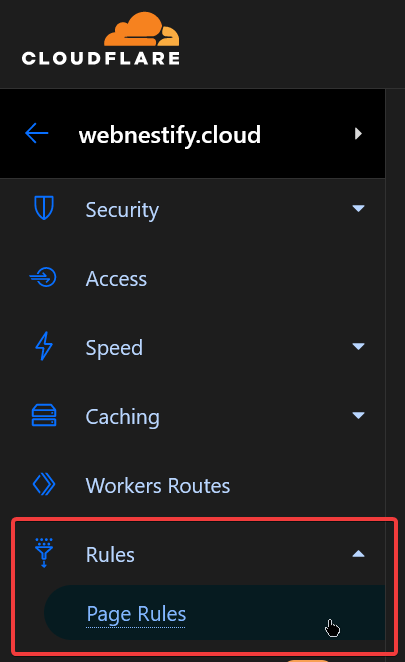
- Go to page rules menu:
- Add new page rule. Make sure you have add your domain and settings exactly like in the image.
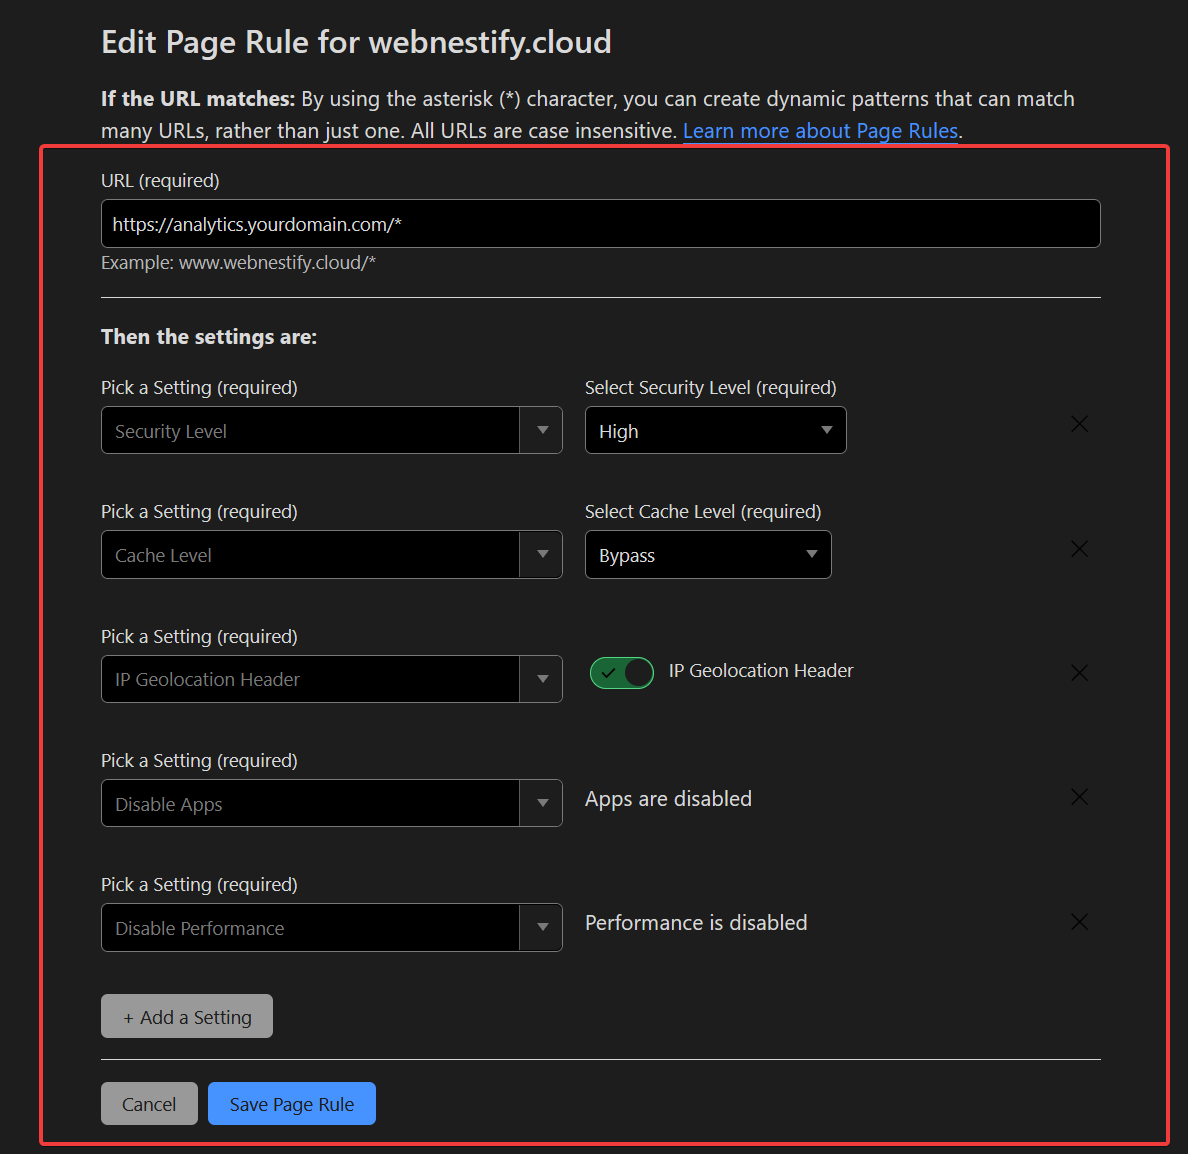
- Save page rule.
Plausible Dashboard
Now is time to visit your Plausible dashboard! Enter your URL you chosen and enter your main email and password that you created in installation file.
If you like Plausible software, please consider sponsoring Plausible project or subscribing to their cloud platform.
WordPress Installation
Follow this video tutorial to get you started with tracking.
About Webnestify
Imagine a world where you can focus on your business and less time maintaining your cloud infrastrucure. With Webnestify cloud based solutions, we provide customized solutions for all types of companies to meet their needs; no matter how big or small they may be!
Read our reviews on Trustpilot!
Subscribe to our YouTube channel!
If you need to setup your own Docker instances or need help with security, visit our Docker deployment service.